5 steps to set up reverse proxy and HTTPS for Docker container using nginx-proxy
5 steps to set up reverse proxy and HTTPS (free SSL certificate) for Docker container using nginx-proxy


อยากทำ HTTPS เพื่อเพิ่มความปลอดภัยให้ app ที่ run อยู่บน Docker container ต้องทำยังไง? บล็อกนี้มีคำตอบครับ ;)
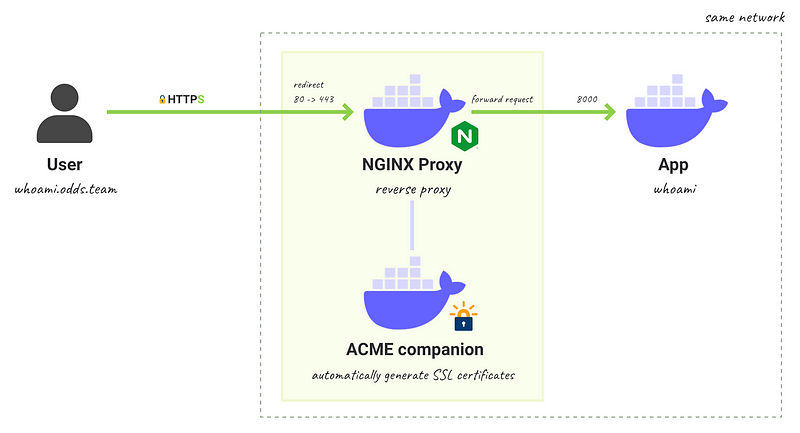
การ redirect HTTP ให้เป็น HTTPS, การ foward request ไปยัง app ที่ต้องการ หรือการจัดการ SSL certificates สิ่งเหล่านี้จะไม่ใช่เรื่องยากอีกต่อไป ถ้าเราใช้ nginx-proxy และ acme-companion containers ซึ่งทั้งคู่เป็น open sources ที่ถูกพัฒนาขึ้นมาเพื่อตอบโจทย์เรื่องนี้โดยเฉพาะ จากจุดเริ่มต้นเมื่อปี 2014 ปัจจุบันก็ยังมี activity บน Github repository ให้เห็นอยู่เรื่อย ๆ


แล้ว nginx-proxy และ acme-companion คืออะไร? และทำงานยังไง?
- nginx-proxy เป็น nginx container สำหรับทำ reverse proxy ไปยัง containers ต่าง ๆ โดยมี docker-gen ช่วย generates reverse proxy configs และ reload nginx ให้อัตโนมัติเมื่อ containers ปลายทางมีการ started หรือ stopped
- acme-companion เป็น lightweight container สำหรับจัดการ free SSL certificates จาก Let’s Encrypt ให้ nginx-proxy แบบอัตโนมัติ ทั้งการสร้าง (creation) และการต่ออายุ (renewal) ก่อนหมดอายุ 30 วัน ผ่าน ACME protocol
ในบล็อกนี้จะแสดงขั้นตอนการทำ HTTPS ให้กับ app เล็ก ๆ ชื่อ whoami เพื่อแสดง container id ผ่านโดเมน whoami.odds.team โดยใช้ nginx-proxy และ acme-companion containers
Let’s start!
เพื่อความกระชับขอใช้ชื่อ nginx-proxy containers แทน nginx-proxy และ acme-companion containers นะครับ
1. Create Docker compose file for nginx-proxy containers
สร้างไฟล์ Docker compose สำหรับ nginx-proxy containers ชื่อ nginx-proxy.yaml
version: "3.9"
services:
  nginx-proxy:
    image: nginxproxy/nginx-proxy
    container_name: nginx-proxy
    ports:
      - "80:80"
      - "443:443"
    volumes:
      - conf:/etc/nginx/conf.d
      - vhost:/etc/nginx/vhost.d
      - html:/usr/share/nginx/html
      - certs:/etc/nginx/certs:ro
      - /var/run/docker.sock:/tmp/docker.sock:ro
    network_mode: bridge
  acme-companion:
    image: nginxproxy/acme-companion
    container_name: acme-companion
    volumes_from:
      - nginx-proxy
    volumes:
      - certs:/etc/nginx/certs:rw
      - acme:/etc/acme.sh
      - /var/run/docker.sock:/var/run/docker.sock:ro
    network_mode: bridge
volumes:
  conf:
  vhost:
  html:
  certs:
  acme:
จากไฟล์ข้างต้น nginx-proxy containers จะ mount /var/run/docker.sock volume เพื่อคอยตรวจจับ events ต่าง ๆ ที่เกิดขึ้นบน Docker host ผ่าน Docker socket ทำให้เมื่อมี started หรือ stopped app container event เกิดขึ้น nginx-proxy containers จะรับทราบและอ่าน metadata เช่น environment variables ของ app container แล้วนำมาสร้าง reverse proxy configs หรือ SSL certificate ให้อัตโนมัติ
และสำหรับ SSL certificates ที่ถูกสร้างโดย acme-companion container จะแชร์ให้กับ nginx-proxy container ผ่าน certs volume เพื่อให้ nginx เอาไปใช้นั่นเอง
2. Start nginx-proxy containers
docker-compose -f nginx-proxy.yaml up -d3. Update app container configs
เพิ่ม environment variables ให้กับ app container ที่ต้องการ
Variables สำหรับให้ nginx-proxy ทำ reverse proxy
- VIRTUAL_HOST — โดเมนที่ต้องการให้เข้าถึง container
- VIRTUAL_PORT — port ของ app container
Variables สำหรับให้ acme-companion สร้าง SSL certificate
- LETSENCRYPT_HOST — โดเมนสำหรับ issue SSL certificate โดย Let’s Encrypt
- LETSENCRYPT_EMAIL — อีเมลสำหรับรับ notifications จาก Let’s Encrypt (ต้องเป็นอีเมลที่มีอยู่จริง)
...
    environment:
      - VIRTUAL_HOST=<YOUR_VIRTUAL_HOST>
      - VIRTUAL_PORT=<YOUR_VIRTUAL_PORT>
      - LETSENCRYPT_HOST=<YOUR_LETSENCRYPT_HOST>
      - LETSENCRYPT_EMAIL=<YOUR_LETSENCRYPT_EMAIL>
จากนั้น expose port ของ app container สำหรับทำ proxy โดยใช้คำสั่ง EXPOSE ที่ไฟล์ Dockerfile หรือใช้ expose flag ที่ไฟล์ Docker compose
...
    expose:
      - "<YOUR_APPLICATION_PORT>"
และที่สำคัญต้องตั้งค่า network ของ app container และ nginx-proxy containers ให้เป็น network เดียวกัน เพื่อให้สามารถเชื่อมต่อระหว่างกันได้ ซึ่งตอนนี้เราใช้เป็น default bridge (*ถ้ามีหลาย apps แนะนำให้ใช้ user-defined bridge เพราะจะได้ connect กันระหว่าง apps ผ่านชื่อ container ได้)
...
    network_mode: bridge
เมื่ออัปเดตส่วนต่าง ๆ แล้ว จะได้ไฟล์ Docker compose สำหรับ whoami app ชื่อ whoami.yaml ดังนี้
version: "3.9"
services:
  whoami:
    image: jwilder/whoami
    container_name: whoami
    expose:
      - "8000"
    environment:
      - VIRTUAL_HOST=whoami.odds.team
      - VIRTUAL_PORT=8000
      - LETSENCRYPT_HOST=whoami.odds.team
      - [email protected]
    network_mode: bridge
โดนเมน whoami.odds.team เป็นเพียงตัวอย่างประกอบบล็อกเท่านั้น
4. Run the app container
docker-compose -f whoami.yaml up -dรอสักครู่เพื่อให้ nginx-proxy containers อัปเดต reverse proxy configs และสร้าง SSL certificate
ถ้า app container เคย run ไว้แล้ว ให้ rerun อีกครั้งเพื่ออัปเดต configs
5. Test
ทดสอบการทำงานของ reverse proxy บน local ต้องสามารถ forward request จากโดเมน whoami.odds.team ไปยัง app container ได้อย่างถูกต้อง
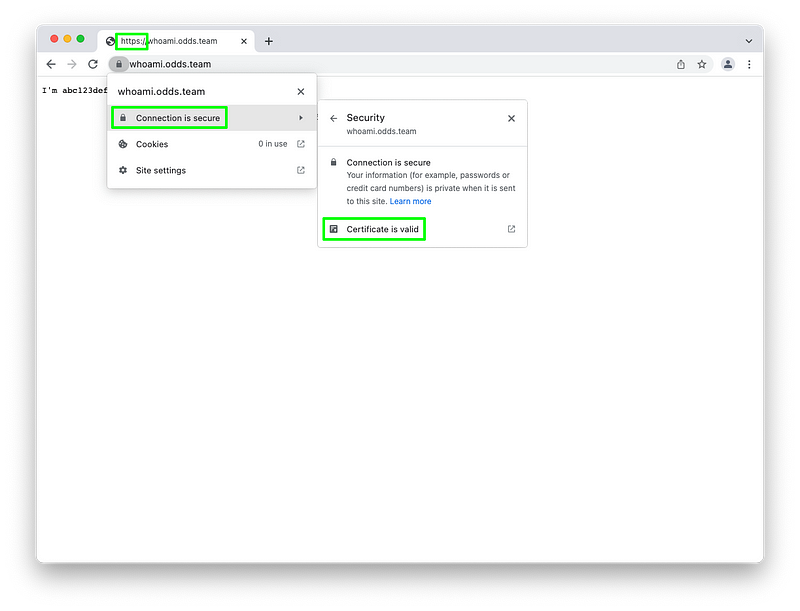
curl -LH "Host: whoami.odds.team" localhost# Output
I'm abc123def456จากนั้นไปที่ https://whoami.odds.team บนเว็บเบราว์เซอร์เพื่อตรวจสอบ HTTPS และ SSL certificate ถ้าใช้ Chromium ต้องแสดงข้อความ “Connection is secure” และ “Certificate is valid” (*อย่าลืม map domain มาที่เครื่องที่ run apps)
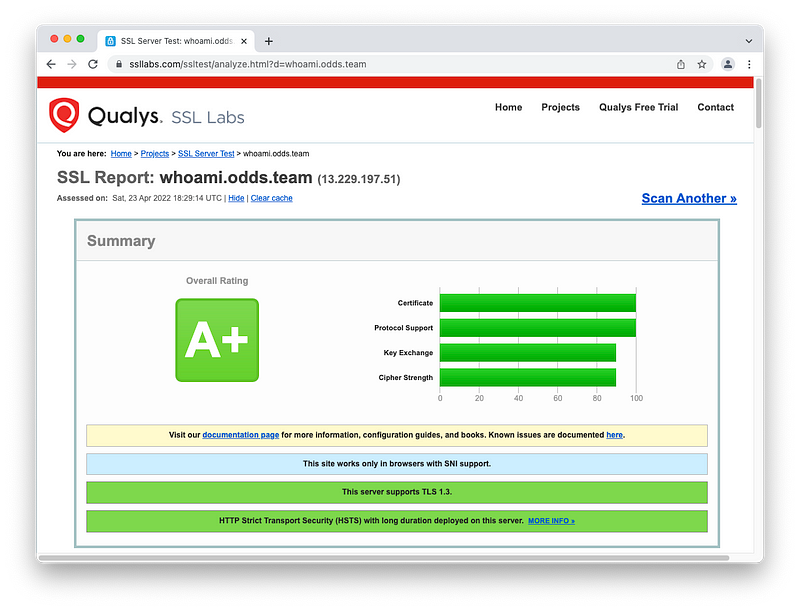
นอกจากนี้สามารถตรวจสอบ SSL configs ของโดเมนเราเพิ่มเติมได้ที่ SSL Labs
Clean up
docker-compose -f nginx-proxy.yaml down --volumes
docker-compose -f whoami.yaml down
My code
atbee

